Streamline Docking Bracket Complete

Streamline Docking Bracket

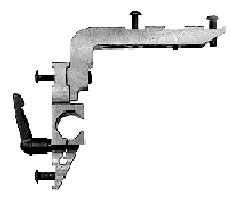
The GAD1 will work with the 1.580″ O.D. and smaller center post size. The GAD1 and the GAD2 have the same features. The GAD1 has a smaller width fork and will only accept the 1.580″ below I.D. docking rings. If you have a Pro sled with a 1.500″ post size and think you will be upgrading to a 2″ post in the future, I would suggest buying the GAD2. That way you will only need to purchase a different size docking ring. Also reintroduced for the Mag-Dock. This will integrate into what you already are using. The GAD2 larger version of the GAD1. This accommodates the all the post sizes. As before the same great features are still inter-graded the key features are, no aircraft pin, automatically locks the sled in place, securely holds the sled from flopping from side to side when changing magazines or lenses, the docking ring can be positioned right under the top stage, the post never touches the fork when docking, the Gorelock1 & 2 has a built in 2 degree angle, the sled can be rotated in the fork for adjustments, blue release levers are on both sides for ambidextrous operation, two handed control on the sled when mounting and dismounting.

GAD1 has a smaller diameter fork and will only accept the 1.580″ and smaller I.D. docking rings. You will need the GAD1 if using a center post size smaller than 1.580″. GAD1 size docking rings listed largest to smallest.  Master/Ultra/Clipper 1.580″, 1500″, 1.495″, 1.477″, 1.371″, 1.102″, .859″  Docking rings now for the Flyer/Zephyr/Scout in stock. The O.D. of all the rings are the same size. Be sure and double check the size for low mode placement.

GAD2 now accepts the largest to smallest center post size, starting with the MK-V 4 stage center post size of 2.125″, 2.00″, 1.860″, 1.800 “, 1.790″,1.750″ Volt, 1.685″, 1.580″, 1.500″ 1.495″ 1.477” The O.D. of all the rings are the same size. Be sure and double check the size for low mode placement.

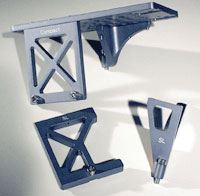
Streamline Balance bracket. New and improved positive stand clamping. Designed for 5/8″ baby stud, light-stands and c-stands. (Will not work on 1/2″ lightweight light stands) Larger balance stud screws. Fork tilt function still built in. Streamline means no Kipp handles sticking out. You can now place your tool holder or post holder on either side or both for a total workstation. Use your 5/32″ or 4mm T-handle too clamp bracket to stand.

Balance Studs, Their are three sizes of studs to choose from. This is the same size as your arm post, for your gimbals to locate for sled balance.  Sizes: 3/4″ Tiffen, 5/8″ Pro-3A, 1/2″ Flyer, Scout

Streamline Balance Bracket

New Streamline balance bracket that is user friendly. Here you go Pro owners! Spin balance on the docking bracket. No more setting up the dolly or extinction arms. And 3A owners, no more turning the docking bracket around to balance the sled. Spin or static balance can be achieved of any sled with this new design. No more banging of the arm and the tools getting in the way when turning the docking bracket around as before, not to mention holding the rig and trying to do this at the same time. This balance bracket solves allot of the headaches. To balance the sled simply un-dock from the Gorelock and pull the balancing post towards you and position the gimbal on the stud and spin or static balance. When done remove from stud and slide balancing post to the rear and dock the sled. The balancing post can be used to hang the vest when not in the balance mode.The blue knob is for setting the tension or drag on the balancing post. There are two 5/8″ C-stand clamps to choose from. Designed for 5/8″ baby stud light stand or c-stands. (Will not work with 1/2″ lite-weight light stands). The forward position will be used 90% of the time. The second position are those few times when you need more clearance between the stand and the sled, like low mode. Use your 5/32″ or 4mm  T-handle to clamp bracket onto stand. (The balance post extends 13″ inches from the stand. The arm stinger can be positioned from side to side by pushing up and over.(Spring loaded) The tool holder can be placed on either side of the docking bracket or can be removed all together, as you prefer. The extra holes can be used for the  arm post holder . (Not supplied with docking bracket) Also rock steady, no slop in movement of adjusting parts. Body is hard anodized black, and the brake knob is blue. Arm stinger and studs are 303 stainless steel. (Rev-2 Allows the Gad to be tilted for easy charting of the camera.)

This is available in Pro/3A/EFP & Master/Elite, Ultra/Clipper stud sizes. Now Archer.

Moviecam Compact/SL L.M.B.

Moviecam Compact/SL low mode bracket combo kit. Now a L.M.B. that will work on both bodies. Simple to install and lightweight. The kit includes one cheese plate and four standoff’s. (Two for Compact and two for SL) Select the standoffs for the body that you are using and the cheese plate. The cheese plate has two counter bore slots for the square to round iris rods, for mounting lens motors. (Rods not included) The cheese plate can be adjusted fore and aft on the standoffs for center balance. All screws included. The L.M.B. can also be purchased as a dedicated bracket for each model separately. Camera courtesy of Rocky Mountain M.P. Rental. Weight: 10oz.

Arri 435 Low Mode Bracket

This is a low mode bracket that has all the features that we have needed. This bracket will enable the operator to preset the camera tilt angle. You will be able to adjust it up or down to about a 30-degree angle (see photo). There is an additional bracket (Iris rod) that mounts on the side of the body to mount a motor. The top plate will have an adjustment from side to side of 3″ inches. The top plate has meshed 3/8″-16 and 1/4″-20 tapped holes for your sled dovetail. It also can be turned around (cantilevered for side to side) and cantilevered fore and aft. Small in size to reduce weight, but sturdy to add support to the dovetails. The new design folds small to save space in your case.
Kit contains: bracket, iris rod mount,Allen tool, and net pouch. (Hard anodized gray to match camera)

Arri Alexa+ Steadicam Plate

This is the bottom mounting plate to bridge the shoulder cut out of the camera. Screws into front of the body and locates in the shoe in the rear. This replaces your Steadicam dovetail . So it mounts directly. Lots of adjustment for different camera configurations. Plus (+) it will also work with the Red camera and you can remove the locating pin and mount it to the Sony Quick release plate. #CP003-U Alexa to Master/Ultra Steadicam Plate.

Arri SR-3 Low Mode Bracket

This is a low mode bracket is for the SR-3 only. This mounts to the top of the handle with a 3/8-16 screw (Supplied) and to the photo shoe that is located on front. This clears the way for the color taps and after market side taps to be used. Easy and quick to install. An optional motor rod adapter.

Arri SR-3 IVS – Low Mode Bracket

This low mode bracket is specifically made for the Arri SR-3 IVS model camera body. Like the lmb picture above. This mounts to the top of the handle with two 3/8-16 screws.(Supplied) The screws are captive so they stay with the bracket at all times. The IVS model camera does not have the photo shoe on the front of the handle. However this bracket will still allow for the Iris mount to be used. (Above) This bracket was designed with the assistance of Clairmont camera. (Anodized Purple)

Hill Pana Bracket

The Pana bracket mounts onto Panavision® cameras only.
This bracket allows up to 5 locations to mount rods. The bracket is very simple to install. It just slides onto the round accessory plug/matte box rod holder. This bracket is very strong and secure and will support any lens drive motor. Also will not interfere with low mode operation. (Rods sold separately)